This is all over the net today, but it's worth linking to. Adobe's got this "content aware fill" they are working on that is just crazy.
I don't currently own or use Photoshop, but something like this would be super-tempting to buy.
Read morePhoto Credit
One of my photos from this summer was selected to use in an online tour guide for San Francisco. It is one of my better photos I think (it's actually my current desktop photo on my main monitor). It's not anything that I get paid for or anything but I do get credited which is pretty cool. The site that used it is called Schmap and they do guides for a variety of cities.
They used one of my shots from Sausalito as a reference for a place called "Sausalito Bay Adventures" which is actually in San Francisco and I didn't take the photo from a boat so I'm not convinced it's a fantastic fit, but whatever. I guess you could see a very similar view from a powerboat if you sailed it across it across the Bay and looked back. Anyway, you can see the image on their site if you'd like.
 One day I'll process the rest of the photos sitting in my "to be processed" folder in Aperture. :-)
Read more
Smoking the Thanksgiving Turkey
As I do out here in California I smoked the turkey (hot-smoked, not cold-smoked for the aficionados out there) for Thanksgiving last week. Nothing particularly fancy, soak some wood chips while the charcoal lights, then put 'em in a foil packet and let the bird cook at a fairly low heat while the smoke does the work. I mention it mainly because the smoke was swirling prettily out of the grill and I had some time to catch a few photos of it.
 There are a couple more on Flickr if you like this one.
One thing that surprised me was I could only see the smoke from one side. I tried taking shots from the other side so there was an orange tree in the background but the smoke disappeared. My completely fabricated explanation for this is that the smoke particles must be sort of teardrop-shaped and the wind orients them in a particular manner. The light was fairly directional (these were shot close to noon, but at this time of the year the sun is pretty southern), so from some angles the smoke doesn't reflect as much light? Anyways, I liked these pictures, and it motivated me to import stuff from the memory card. I still have those Point Bonita Lighthouse pictures to work on.
There are a couple more on Flickr if you like this one.
One thing that surprised me was I could only see the smoke from one side. I tried taking shots from the other side so there was an orange tree in the background but the smoke disappeared. My completely fabricated explanation for this is that the smoke particles must be sort of teardrop-shaped and the wind orients them in a particular manner. The light was fairly directional (these were shot close to noon, but at this time of the year the sun is pretty southern), so from some angles the smoke doesn't reflect as much light? Anyways, I liked these pictures, and it motivated me to import stuff from the memory card. I still have those Point Bonita Lighthouse pictures to work on.
Read moreWhen Hobbies Collide
I left last week's D&D session set up on the table until I got a chance to take some photographs. I'm amused to talk about the process I use to play online and there are a couple of photo enthusiasts who read the blog who might well comment on improving the setup.
First off, what the what? There's a long story behind this but the key bit is that I'm running a Dungeons & Dragons campaign online. We use Skype for voice chat, and I have this moderately janky Ruby on Rails application I threw together to display pictures to the players. I pop my camera up on a tripod and point it at miniatures and upload the pictures, thus giving us an online approximation of gathering around the table and playing.
OK. So given that as background I was surprised at the amount of inconsistency I was getting from the pictures. On different nights the camera would focus on weird areas of the map, as I tried different camera angles I'd get different results, it's been a difficult process. I finally got a process I'm pretty happy with but I'm happy to hear suggestions for improvement.
A lot of it is pretty ghetto. You can see my cheap-ass tripod that is supposed to be for Karin to have at school but I sort of stole. (Not to say it's school property's - it's Karin's but it lives in my office most of the time now.) I don't have a separate off-camera flash, or a stand and a nice diffusion umbrella and all - I have a halogen work light with two independent bulbs. The camera is my Canon Rebel XTi and I use a 28mm prime lens (which given the Canon crop factor works out to the effective crop of a 45mm lens). I've screwed with the lighting a lot and the thing that seems to work best is to point both halogen lights straight up and bounce them off the ceiling. I had been pointing one sideways as a fill light but that makes some really odd shadows on the miniatures. I let the camera use its flash for some fill.
Normally I shoot in RAW mode, but for these shots I need a JPG and processing time is a concern so I just shoot JPG (the large and "unsmoothed" images since I can process them later and use better sharpening filters and the like). I usually put the camera in the A-DEP mode which tells the camera to maximize depth of field. I've left everything else on the "do what you think is best" sort of switches - so auto white balance and the like. ISO is set at 800.
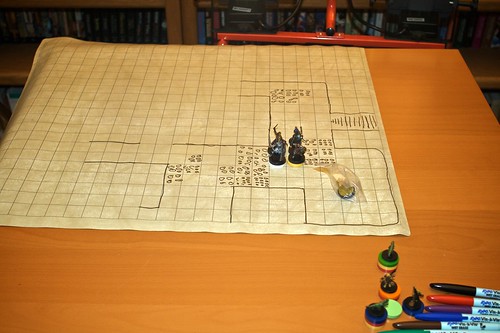
OK, enough babble. Here's the basic setup:
 In this shot the only lighting is the halogens you see and the flash of the camera itself. Oh, and there's a polarizing filter on the lens. Of course, normally the camera is on the tripod, but you get the idea. This was the real actual geometry I used in the last session, I just popped the camera off the tripod to shoot this.
Here's a closer shot of the mat. The mat is "wet erase" which means I can draw on it with "Vis a Vis" markers - you can see those at the edge of the shot:
In this shot the only lighting is the halogens you see and the flash of the camera itself. Oh, and there's a polarizing filter on the lens. Of course, normally the camera is on the tripod, but you get the idea. This was the real actual geometry I used in the last session, I just popped the camera off the tripod to shoot this.
Here's a closer shot of the mat. The mat is "wet erase" which means I can draw on it with "Vis a Vis" markers - you can see those at the edge of the shot:
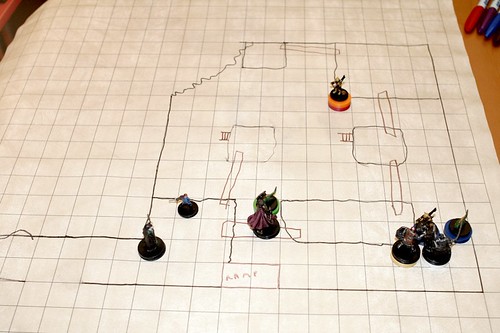
 So what does this ultimately yield? Well I have an Automator action that tells the camera software to take a picture. Then it asks me to find the picture on the hard drive, passes it off to Pixelmator which does an "Auto Enhance" which adjusts the levels. Pixelmator also resizes to a 1023 pixel wide image (not sure how I picked that size, but it's what I use). Then it uploads the file to a public folder on the net and asks me for a description of the image. Finally it sends a special URL to the Rails application causing an update with the new picture and description and javascript on all the player's browsers fetches the new data automatically.
Here's an actual example from last week's session, plucked straight from the web application:
So what does this ultimately yield? Well I have an Automator action that tells the camera software to take a picture. Then it asks me to find the picture on the hard drive, passes it off to Pixelmator which does an "Auto Enhance" which adjusts the levels. Pixelmator also resizes to a 1023 pixel wide image (not sure how I picked that size, but it's what I use). Then it uploads the file to a public folder on the net and asks me for a description of the image. Finally it sends a special URL to the Rails application causing an update with the new picture and description and javascript on all the player's browsers fetches the new data automatically.
Here's an actual example from last week's session, plucked straight from the web application:
 So, like I said it works pretty well. But if anybody has any suggestions I'd love to hear them. While I think having photographic lighting would be a big win so far I've been hard pressed to say what else I'd use it for. I don't do posed portraits so I'd be buying lighting equipment just for D&D, which seems ridiculous.
Read more
In this shot the only lighting is the halogens you see and the flash of the camera itself. Oh, and there's a polarizing filter on the lens. Of course, normally the camera is on the tripod, but you get the idea. This was the real actual geometry I used in the last session, I just popped the camera off the tripod to shoot this.
Here's a closer shot of the mat. The mat is "wet erase" which means I can draw on it with "Vis a Vis" markers - you can see those at the edge of the shot:
So what does this ultimately yield? Well I have an Automator action that tells the camera software to take a picture. Then it asks me to find the picture on the hard drive, passes it off to Pixelmator which does an "Auto Enhance" which adjusts the levels. Pixelmator also resizes to a 1023 pixel wide image (not sure how I picked that size, but it's what I use). Then it uploads the file to a public folder on the net and asks me for a description of the image. Finally it sends a special URL to the Rails application causing an update with the new picture and description and javascript on all the player's browsers fetches the new data automatically.
Here's an actual example from last week's session, plucked straight from the web application:
So, like I said it works pretty well. But if anybody has any suggestions I'd love to hear them. While I think having photographic lighting would be a big win so far I've been hard pressed to say what else I'd use it for. I don't do posed portraits so I'd be buying lighting equipment just for D&D, which seems ridiculous.Tilt-Shift for the win!
This is awesome:
Bathtub II from Keith Loutit on Vimeo.
(I saw it from Frederick V. Johnson’s Twitter.)
Read more