iWork '09 gets mixed marks
In the past I've complained about iWork '08, specifically about the limitations of Numbers in creating a chart and about Pages being unable to create mailing labels. Well I got iWork '09 on Friday and installed it today. It's a mixed bag.
Numbers seems to be much better in terms of performance. At some point last year I had split the cat weight spreadsheet into two parts because my desktop Mac Pro would often beach-ball when trying to add data to the chart. Yes, you read that right. I've got around 3 years of data for my cat weights and it was too much data for Numbers '08 to crunch smoothly on a four-core machine with four gigabytes of RAM. Two cats, weighed roughly weekly, and a second set of weights to draw a "target weight" line. (I no longer draw that target line, but I did back in 2006 & 2007.) Definitely less than one thousand data points in the set, probably around 600. I'm happy to report that Numbers '09 seems much improved in terms of performance. I fiddled with the old chart a bit just to see how it worked with the "big" data set and couldn't get a beach-ball. The chart still can only have 10 steps, but it does allow me to set the chart's min/max values to ones inside the data set. This means I can make the chart go from ten to twenty pounds and Heisenberg just spikes off the chart for that one week where he broke twenty pounds.
Pages opened a few Pages files I have lying around just fine. It still has absolutely no options for printing mailing labels, despite adding a stack of new formats. (Is "Loft for Rent Flyer" really a more useful format than "sheet of return mailing labels"? Really? I do love the specificity of it though. Don't try renting your crappy old suburban condo with this format buddy!) It did occur to me to check if Address Book would print a sheet of labels and for a moment I thought I was onto something. Address Book will print labels, but only one label per Address Book entry and you can't pick which label on the page it is. (In other words, Address Book is optimized for printing labels for a whole Christmas List of people which isn't a bad thing but it isn't useful for my task.)
Some of these issues are getting more severe because I've banished Microsoft Office altogether from my Macs. (I still have Excel 2000 installed in a Windows ghetto box for work reasons, but I don't have to like it, and even there I think I only installed Excel, not the full Office.) I've been debating what to do about my own personal weight spreadsheet (which I only have on paper for the last few months) and I'm almost out of return labels. I'm happy to say that I think I could easily recreate the weight charts from The Hacker's Diet in Numbers '09 now and not feel like I dip my computer in molasses to update the data.
As for the labels ... I'll probably borrow one of Karin's laptops, use Microsoft Word and print out a PDF file of a sheet of labels. That's ridiculous but Apple doesn't want to seem to solve the problem. I was hopeful that Pages '09 would print labels because mail merge is a big feature they added but no dice.
In the past I've complained about iWork '08, specifically about the limitations of Numbers in creating a chart and about Pages being unable to create mailing labels. Well I got iWork '09 on Friday and installed it today. It's a mixed bag.
Numbers seems to be much better in terms of performance. At some point last year I had split the cat weight spreadsheet into two parts because my desktop Mac Pro would often beach-ball when trying to add data to the chart. Yes, you read that right. I've got around 3 years of data for my cat weights and it was too much data for Numbers '08 to crunch smoothly on a four-core machine with four gigabytes of RAM. Two cats, weighed roughly weekly, and a second set of weights to draw a "target weight" line. (I no longer draw that target line, but I did back in 2006 & 2007.) Definitely less than one thousand data points in the set, probably around 600. I'm happy to report that Numbers '09 seems much improved in terms of performance. I fiddled with the old chart a bit just to see how it worked with the "big" data set and couldn't get a beach-ball. The chart still can only have 10 steps, but it does allow me to set the chart's min/max values to ones inside the data set. This means I can make the chart go from ten to twenty pounds and Heisenberg just spikes off the chart for that one week where he broke twenty pounds.
Pages opened a few Pages files I have lying around just fine. It still has absolutely no options for printing mailing labels, despite adding a stack of new formats. (Is "Loft for Rent Flyer" really a more useful format than "sheet of return mailing labels"? Really? I do love the specificity of it though. Don't try renting your crappy old suburban condo with this format buddy!) It did occur to me to check if Address Book would print a sheet of labels and for a moment I thought I was onto something. Address Book will print labels, but only one label per Address Book entry and you can't pick which label on the page it is. (In other words, Address Book is optimized for printing labels for a whole Christmas List of people which isn't a bad thing but it isn't useful for my task.)
Some of these issues are getting more severe because I've banished Microsoft Office altogether from my Macs. (I still have Excel 2000 installed in a Windows ghetto box for work reasons, but I don't have to like it, and even there I think I only installed Excel, not the full Office.) I've been debating what to do about my own personal weight spreadsheet (which I only have on paper for the last few months) and I'm almost out of return labels. I'm happy to say that I think I could easily recreate the weight charts from The Hacker's Diet in Numbers '09 now and not feel like I dip my computer in molasses to update the data.
As for the labels ... I'll probably borrow one of Karin's laptops, use Microsoft Word and print out a PDF file of a sheet of labels. That's ridiculous but Apple doesn't want to seem to solve the problem. I was hopeful that Pages '09 would print labels because mail merge is a big feature they added but no dice.
Numbers seems to be much better in terms of performance. At some point last year I had split the cat weight spreadsheet into two parts because my desktop Mac Pro would often beach-ball when trying to add data to the chart. Yes, you read that right. I've got around 3 years of data for my cat weights and it was too much data for Numbers '08 to crunch smoothly on a four-core machine with four gigabytes of RAM. Two cats, weighed roughly weekly, and a second set of weights to draw a "target weight" line. (I no longer draw that target line, but I did back in 2006 & 2007.) Definitely less than one thousand data points in the set, probably around 600. I'm happy to report that Numbers '09 seems much improved in terms of performance. I fiddled with the old chart a bit just to see how it worked with the "big" data set and couldn't get a beach-ball. The chart still can only have 10 steps, but it does allow me to set the chart's min/max values to ones inside the data set. This means I can make the chart go from ten to twenty pounds and Heisenberg just spikes off the chart for that one week where he broke twenty pounds.
Pages opened a few Pages files I have lying around just fine. It still has absolutely no options for printing mailing labels, despite adding a stack of new formats. (Is "Loft for Rent Flyer" really a more useful format than "sheet of return mailing labels"? Really? I do love the specificity of it though. Don't try renting your crappy old suburban condo with this format buddy!) It did occur to me to check if Address Book would print a sheet of labels and for a moment I thought I was onto something. Address Book will print labels, but only one label per Address Book entry and you can't pick which label on the page it is. (In other words, Address Book is optimized for printing labels for a whole Christmas List of people which isn't a bad thing but it isn't useful for my task.)
Some of these issues are getting more severe because I've banished Microsoft Office altogether from my Macs. (I still have Excel 2000 installed in a Windows ghetto box for work reasons, but I don't have to like it, and even there I think I only installed Excel, not the full Office.) I've been debating what to do about my own personal weight spreadsheet (which I only have on paper for the last few months) and I'm almost out of return labels. I'm happy to say that I think I could easily recreate the weight charts from The Hacker's Diet in Numbers '09 now and not feel like I dip my computer in molasses to update the data.
As for the labels ... I'll probably borrow one of Karin's laptops, use Microsoft Word and print out a PDF file of a sheet of labels. That's ridiculous but Apple doesn't want to seem to solve the problem. I was hopeful that Pages '09 would print labels because mail merge is a big feature they added but no dice.
Modern Drawing
The return of D&D to my life continues to have odd ramifications. The latest one is that I'm coming to grips with drawing in a modern art program. I use Pixelmator which would probably be very familiar to any Photoshop user. Pixelmator uses the GPU for nice performance and is a fraction of the cost of Photoshop but it has the same basic concepts of drawing with layers, masks, and brushes.
The last time I ran a role-playing campaign I did maps with DeluxePaint on the Amiga (Ouch, ouch! It hurts to admit how long ago that was.) so that was all direct pixel-by-pixel editing. Long-time readers might be saying "Wait, I've seen you use Photoshop Elements before so what are you talking about?" Well, dear reader, you're absolutely correct but you've seen me use Photoshop as a photo editor, not for drawing. I'd mainly run filters, levels and the like and maybe a touch of cloning in order to remove something.
Drawing in such a program is powerful but for me it's an unusual way to think about composition. Working out what goes in what layer is important both in terms of preserving flexibility later and in terms of Z-ordering (what is on top of what). The map I'm building right now is primarily a coastline and my first stab at it had a thick black line for the coast, blue for the water and brown for the ground and all of that was one layer. Later I realized that I really wanted the SHAPE of the coast in one layer and that the fills should go down in another layer. I could do that with masks, but what I did was to make a selection with the "Magic Wand" tool to select the sea area (from the layer with the coastline) and then fill that selection in a separate layer. Presto - instant separate layer!
This morning I was working on making a "mountain" brush so I could simply brush in mountain ranges. Brushes are another kind of weird concept. My first attempt at brushes was to make a "city dot" which was a white circle with a black border. Turns out what Pixelmator really does is uses the brush image as an alpha mask, so you can't put colors in the brush. It also means that I have to draw the brush in white, not black. So I ended up saving the dot as a separate file and doing copy and paste. The mountain brush works pretty well after I figured out how to tile it and I got a nice set of "mountain shapes" with just a couple of brushstrokes. Next up I need some trees and maybe a subtle wave texture to make the sea less monochromatic.
While layers are powerful they can get out of control fast. Each city dot became its own layer and the text label for each city was a second layer. So every city had two layers and the file got a bit messy to find the layers I wanted. Deciding that the cities were in good positions and flattening eight layers into a single "Cities" layer was key here, but it does mean I can't edit the text or easily move the cities relative to each other.
I'll throw up the map for people to mock and comment on. I'm sure I have readers who could have done the whole thing in fifteen minutes as opposed to the fact I've worked on it for a few hours now but I'm happy with the fact that I'm beginning to understand the way Pixelmator (and by extension Photoshop) works.
(If you're a reader and in the D&D campaign you can consider this quasi-canonical. The map without any accompanying text is pretty worthless and the intention is to provide this map to you as a campaign handout, but it will see more tweaks before you get it. And obviously it will be less blank by the time it arrives in your hands.)
 (click image for embiggenation)
For what it's worth this is currently in eight layers. I haven't flattened the mountains into a single layer yet, nor have I put in a text label for the river. I also haven't really decided if each topographical feature should be a separate layer or if I should just make a single topographical layer. Here's the current layers:
(click image for embiggenation)
For what it's worth this is currently in eight layers. I haven't flattened the mountains into a single layer yet, nor have I put in a text label for the river. I also haven't really decided if each topographical feature should be a separate layer or if I should just make a single topographical layer. Here's the current layers:


The return of D&D to my life continues to have odd ramifications. The latest one is that I'm coming to grips with drawing in a modern art program. I use Pixelmator which would probably be very familiar to any Photoshop user. Pixelmator uses the GPU for nice performance and is a fraction of the cost of Photoshop but it has the same basic concepts of drawing with layers, masks, and brushes.
The last time I ran a role-playing campaign I did maps with DeluxePaint on the Amiga (Ouch, ouch! It hurts to admit how long ago that was.) so that was all direct pixel-by-pixel editing. Long-time readers might be saying "Wait, I've seen you use Photoshop Elements before so what are you talking about?" Well, dear reader, you're absolutely correct but you've seen me use Photoshop as a photo editor, not for drawing. I'd mainly run filters, levels and the like and maybe a touch of cloning in order to remove something.
Drawing in such a program is powerful but for me it's an unusual way to think about composition. Working out what goes in what layer is important both in terms of preserving flexibility later and in terms of Z-ordering (what is on top of what). The map I'm building right now is primarily a coastline and my first stab at it had a thick black line for the coast, blue for the water and brown for the ground and all of that was one layer. Later I realized that I really wanted the SHAPE of the coast in one layer and that the fills should go down in another layer. I could do that with masks, but what I did was to make a selection with the "Magic Wand" tool to select the sea area (from the layer with the coastline) and then fill that selection in a separate layer. Presto - instant separate layer!
This morning I was working on making a "mountain" brush so I could simply brush in mountain ranges. Brushes are another kind of weird concept. My first attempt at brushes was to make a "city dot" which was a white circle with a black border. Turns out what Pixelmator really does is uses the brush image as an alpha mask, so you can't put colors in the brush. It also means that I have to draw the brush in white, not black. So I ended up saving the dot as a separate file and doing copy and paste. The mountain brush works pretty well after I figured out how to tile it and I got a nice set of "mountain shapes" with just a couple of brushstrokes. Next up I need some trees and maybe a subtle wave texture to make the sea less monochromatic.
While layers are powerful they can get out of control fast. Each city dot became its own layer and the text label for each city was a second layer. So every city had two layers and the file got a bit messy to find the layers I wanted. Deciding that the cities were in good positions and flattening eight layers into a single "Cities" layer was key here, but it does mean I can't edit the text or easily move the cities relative to each other.
I'll throw up the map for people to mock and comment on. I'm sure I have readers who could have done the whole thing in fifteen minutes as opposed to the fact I've worked on it for a few hours now but I'm happy with the fact that I'm beginning to understand the way Pixelmator (and by extension Photoshop) works.
(If you're a reader and in the D&D campaign you can consider this quasi-canonical. The map without any accompanying text is pretty worthless and the intention is to provide this map to you as a campaign handout, but it will see more tweaks before you get it. And obviously it will be less blank by the time it arrives in your hands.)
(click image for embiggenation)
For what it's worth this is currently in eight layers. I haven't flattened the mountains into a single layer yet, nor have I put in a text label for the river. I also haven't really decided if each topographical feature should be a separate layer or if I should just make a single topographical layer. Here's the current layers:
The last time I ran a role-playing campaign I did maps with DeluxePaint on the Amiga (Ouch, ouch! It hurts to admit how long ago that was.) so that was all direct pixel-by-pixel editing. Long-time readers might be saying "Wait, I've seen you use Photoshop Elements before so what are you talking about?" Well, dear reader, you're absolutely correct but you've seen me use Photoshop as a photo editor, not for drawing. I'd mainly run filters, levels and the like and maybe a touch of cloning in order to remove something.
Drawing in such a program is powerful but for me it's an unusual way to think about composition. Working out what goes in what layer is important both in terms of preserving flexibility later and in terms of Z-ordering (what is on top of what). The map I'm building right now is primarily a coastline and my first stab at it had a thick black line for the coast, blue for the water and brown for the ground and all of that was one layer. Later I realized that I really wanted the SHAPE of the coast in one layer and that the fills should go down in another layer. I could do that with masks, but what I did was to make a selection with the "Magic Wand" tool to select the sea area (from the layer with the coastline) and then fill that selection in a separate layer. Presto - instant separate layer!
This morning I was working on making a "mountain" brush so I could simply brush in mountain ranges. Brushes are another kind of weird concept. My first attempt at brushes was to make a "city dot" which was a white circle with a black border. Turns out what Pixelmator really does is uses the brush image as an alpha mask, so you can't put colors in the brush. It also means that I have to draw the brush in white, not black. So I ended up saving the dot as a separate file and doing copy and paste. The mountain brush works pretty well after I figured out how to tile it and I got a nice set of "mountain shapes" with just a couple of brushstrokes. Next up I need some trees and maybe a subtle wave texture to make the sea less monochromatic.
While layers are powerful they can get out of control fast. Each city dot became its own layer and the text label for each city was a second layer. So every city had two layers and the file got a bit messy to find the layers I wanted. Deciding that the cities were in good positions and flattening eight layers into a single "Cities" layer was key here, but it does mean I can't edit the text or easily move the cities relative to each other.
I'll throw up the map for people to mock and comment on. I'm sure I have readers who could have done the whole thing in fifteen minutes as opposed to the fact I've worked on it for a few hours now but I'm happy with the fact that I'm beginning to understand the way Pixelmator (and by extension Photoshop) works.
(If you're a reader and in the D&D campaign you can consider this quasi-canonical. The map without any accompanying text is pretty worthless and the intention is to provide this map to you as a campaign handout, but it will see more tweaks before you get it. And obviously it will be less blank by the time it arrives in your hands.)
(click image for embiggenation)
For what it's worth this is currently in eight layers. I haven't flattened the mountains into a single layer yet, nor have I put in a text label for the river. I also haven't really decided if each topographical feature should be a separate layer or if I should just make a single topographical layer. Here's the current layers:
Well Hello 2009!
For Christmas Karin and I got the Dr. Horrible's Sing-Along Blog DVD, which had three different "Making of" features. The last one is titled "What just happened?" which I think is probably the best summary of 2008 available.
I don't really have a blog post topic today but I wanted to get a new post into the feed. I need to do some book reviews (I could do Anathem, Zoe's Tale, Saturn's Children, or erm, several recent D&D rulebooks - lemme know if there's interest in any of those titles), I got a big stack of board games for Christmas, and I'm getting all psyched up about Lost again (been watching the season four Blu-Rays). I could write about any of that, but none of it seems imperative to me right now.
I flipped through the January posts for 2005-2008 looking for common New Year's themes but I didn't find a lot. I often do some major blog software upgrade over the Christmas holidays and I'm usually annoyed at some big video game. I didn't do any software updates this time and Gamefly is consistently sending me ancient titles from the teens on my software queue right now so I haven't played Dead Space or Fallout 3, or Valkyria Chronicles, or even the new Banjo-Kazooie. I have been playing a boatload of Civilization:Revolution lately, working through winning with all the civilizations and up the difficulty curve. Right now I'm trying to win on the Deity level but the AI cheatiness is ridiculous at that level, enough so that it may exasperate me.
Anyway, welcome to 2009 everyone. I have big goals for 2009 so let's get some balls rolling shall we?
For Christmas Karin and I got the Dr. Horrible's Sing-Along Blog DVD, which had three different "Making of" features. The last one is titled "What just happened?" which I think is probably the best summary of 2008 available.
I don't really have a blog post topic today but I wanted to get a new post into the feed. I need to do some book reviews (I could do Anathem, Zoe's Tale, Saturn's Children, or erm, several recent D&D rulebooks - lemme know if there's interest in any of those titles), I got a big stack of board games for Christmas, and I'm getting all psyched up about Lost again (been watching the season four Blu-Rays). I could write about any of that, but none of it seems imperative to me right now.
I flipped through the January posts for 2005-2008 looking for common New Year's themes but I didn't find a lot. I often do some major blog software upgrade over the Christmas holidays and I'm usually annoyed at some big video game. I didn't do any software updates this time and Gamefly is consistently sending me ancient titles from the teens on my software queue right now so I haven't played Dead Space or Fallout 3, or Valkyria Chronicles, or even the new Banjo-Kazooie. I have been playing a boatload of Civilization:Revolution lately, working through winning with all the civilizations and up the difficulty curve. Right now I'm trying to win on the Deity level but the AI cheatiness is ridiculous at that level, enough so that it may exasperate me.
Anyway, welcome to 2009 everyone. I have big goals for 2009 so let's get some balls rolling shall we?
I don't really have a blog post topic today but I wanted to get a new post into the feed. I need to do some book reviews (I could do Anathem, Zoe's Tale, Saturn's Children, or erm, several recent D&D rulebooks - lemme know if there's interest in any of those titles), I got a big stack of board games for Christmas, and I'm getting all psyched up about Lost again (been watching the season four Blu-Rays). I could write about any of that, but none of it seems imperative to me right now.
I flipped through the January posts for 2005-2008 looking for common New Year's themes but I didn't find a lot. I often do some major blog software upgrade over the Christmas holidays and I'm usually annoyed at some big video game. I didn't do any software updates this time and Gamefly is consistently sending me ancient titles from the teens on my software queue right now so I haven't played Dead Space or Fallout 3, or Valkyria Chronicles, or even the new Banjo-Kazooie. I have been playing a boatload of Civilization:Revolution lately, working through winning with all the civilizations and up the difficulty curve. Right now I'm trying to win on the Deity level but the AI cheatiness is ridiculous at that level, enough so that it may exasperate me.
Anyway, welcome to 2009 everyone. I have big goals for 2009 so let's get some balls rolling shall we?
When Hobbies Collide
I left last week's D&D session set up on the table until I got a chance to take some photographs. I'm amused to talk about the process I use to play online and there are a couple of photo enthusiasts who read the blog who might well comment on improving the setup.
First off, what the what? There's a long story behind this but the key bit is that I'm running a Dungeons & Dragons campaign online. We use Skype for voice chat, and I have this moderately janky Ruby on Rails application I threw together to display pictures to the players. I pop my camera up on a tripod and point it at miniatures and upload the pictures, thus giving us an online approximation of gathering around the table and playing.
OK. So given that as background I was surprised at the amount of inconsistency I was getting from the pictures. On different nights the camera would focus on weird areas of the map, as I tried different camera angles I'd get different results, it's been a difficult process. I finally got a process I'm pretty happy with but I'm happy to hear suggestions for improvement.
A lot of it is pretty ghetto. You can see my cheap-ass tripod that is supposed to be for Karin to have at school but I sort of stole. (Not to say it's school property's - it's Karin's but it lives in my office most of the time now.) I don't have a separate off-camera flash, or a stand and a nice diffusion umbrella and all - I have a halogen work light with two independent bulbs. The camera is my Canon Rebel XTi and I use a 28mm prime lens (which given the Canon crop factor works out to the effective crop of a 45mm lens). I've screwed with the lighting a lot and the thing that seems to work best is to point both halogen lights straight up and bounce them off the ceiling. I had been pointing one sideways as a fill light but that makes some really odd shadows on the miniatures. I let the camera use its flash for some fill.
Normally I shoot in RAW mode, but for these shots I need a JPG and processing time is a concern so I just shoot JPG (the large and "unsmoothed" images since I can process them later and use better sharpening filters and the like). I usually put the camera in the A-DEP mode which tells the camera to maximize depth of field. I've left everything else on the "do what you think is best" sort of switches - so auto white balance and the like. ISO is set at 800.
OK, enough babble. Here's the basic setup:
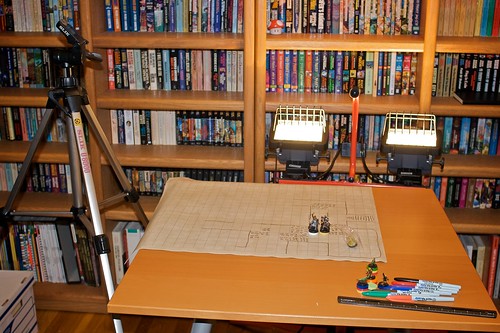 In this shot the only lighting is the halogens you see and the flash of the camera itself. Oh, and there's a polarizing filter on the lens. Of course, normally the camera is on the tripod, but you get the idea. This was the real actual geometry I used in the last session, I just popped the camera off the tripod to shoot this.
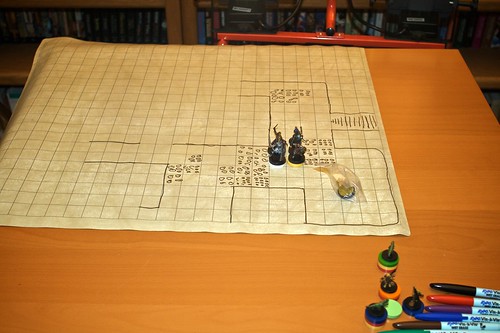
Here's a closer shot of the mat. The mat is "wet erase" which means I can draw on it with "Vis a Vis" markers - you can see those at the edge of the shot:
In this shot the only lighting is the halogens you see and the flash of the camera itself. Oh, and there's a polarizing filter on the lens. Of course, normally the camera is on the tripod, but you get the idea. This was the real actual geometry I used in the last session, I just popped the camera off the tripod to shoot this.
Here's a closer shot of the mat. The mat is "wet erase" which means I can draw on it with "Vis a Vis" markers - you can see those at the edge of the shot:
 So what does this ultimately yield? Well I have an Automator action that tells the camera software to take a picture. Then it asks me to find the picture on the hard drive, passes it off to Pixelmator which does an "Auto Enhance" which adjusts the levels. Pixelmator also resizes to a 1023 pixel wide image (not sure how I picked that size, but it's what I use). Then it uploads the file to a public folder on the net and asks me for a description of the image. Finally it sends a special URL to the Rails application causing an update with the new picture and description and javascript on all the player's browsers fetches the new data automatically.
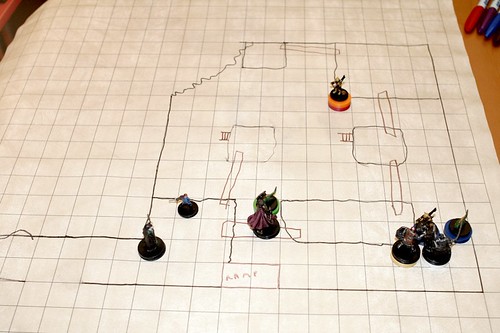
Here's an actual example from last week's session, plucked straight from the web application:
So what does this ultimately yield? Well I have an Automator action that tells the camera software to take a picture. Then it asks me to find the picture on the hard drive, passes it off to Pixelmator which does an "Auto Enhance" which adjusts the levels. Pixelmator also resizes to a 1023 pixel wide image (not sure how I picked that size, but it's what I use). Then it uploads the file to a public folder on the net and asks me for a description of the image. Finally it sends a special URL to the Rails application causing an update with the new picture and description and javascript on all the player's browsers fetches the new data automatically.
Here's an actual example from last week's session, plucked straight from the web application:
 So, like I said it works pretty well. But if anybody has any suggestions I'd love to hear them. While I think having photographic lighting would be a big win so far I've been hard pressed to say what else I'd use it for. I don't do posed portraits so I'd be buying lighting equipment just for D&D, which seems ridiculous.
In this shot the only lighting is the halogens you see and the flash of the camera itself. Oh, and there's a polarizing filter on the lens. Of course, normally the camera is on the tripod, but you get the idea. This was the real actual geometry I used in the last session, I just popped the camera off the tripod to shoot this.
Here's a closer shot of the mat. The mat is "wet erase" which means I can draw on it with "Vis a Vis" markers - you can see those at the edge of the shot:
So what does this ultimately yield? Well I have an Automator action that tells the camera software to take a picture. Then it asks me to find the picture on the hard drive, passes it off to Pixelmator which does an "Auto Enhance" which adjusts the levels. Pixelmator also resizes to a 1023 pixel wide image (not sure how I picked that size, but it's what I use). Then it uploads the file to a public folder on the net and asks me for a description of the image. Finally it sends a special URL to the Rails application causing an update with the new picture and description and javascript on all the player's browsers fetches the new data automatically.
Here's an actual example from last week's session, plucked straight from the web application:
So, like I said it works pretty well. But if anybody has any suggestions I'd love to hear them. While I think having photographic lighting would be a big win so far I've been hard pressed to say what else I'd use it for. I don't do posed portraits so I'd be buying lighting equipment just for D&D, which seems ridiculous.I left last week's D&D session set up on the table until I got a chance to take some photographs. I'm amused to talk about the process I use to play online and there are a couple of photo enthusiasts who read the blog who might well comment on improving the setup.
First off, what the what? There's a long story behind this but the key bit is that I'm running a Dungeons & Dragons campaign online. We use Skype for voice chat, and I have this moderately janky Ruby on Rails application I threw together to display pictures to the players. I pop my camera up on a tripod and point it at miniatures and upload the pictures, thus giving us an online approximation of gathering around the table and playing.
OK. So given that as background I was surprised at the amount of inconsistency I was getting from the pictures. On different nights the camera would focus on weird areas of the map, as I tried different camera angles I'd get different results, it's been a difficult process. I finally got a process I'm pretty happy with but I'm happy to hear suggestions for improvement.
A lot of it is pretty ghetto. You can see my cheap-ass tripod that is supposed to be for Karin to have at school but I sort of stole. (Not to say it's school property's - it's Karin's but it lives in my office most of the time now.) I don't have a separate off-camera flash, or a stand and a nice diffusion umbrella and all - I have a halogen work light with two independent bulbs. The camera is my Canon Rebel XTi and I use a 28mm prime lens (which given the Canon crop factor works out to the effective crop of a 45mm lens). I've screwed with the lighting a lot and the thing that seems to work best is to point both halogen lights straight up and bounce them off the ceiling. I had been pointing one sideways as a fill light but that makes some really odd shadows on the miniatures. I let the camera use its flash for some fill.
Normally I shoot in RAW mode, but for these shots I need a JPG and processing time is a concern so I just shoot JPG (the large and "unsmoothed" images since I can process them later and use better sharpening filters and the like). I usually put the camera in the A-DEP mode which tells the camera to maximize depth of field. I've left everything else on the "do what you think is best" sort of switches - so auto white balance and the like. ISO is set at 800.
OK, enough babble. Here's the basic setup:
In this shot the only lighting is the halogens you see and the flash of the camera itself. Oh, and there's a polarizing filter on the lens. Of course, normally the camera is on the tripod, but you get the idea. This was the real actual geometry I used in the last session, I just popped the camera off the tripod to shoot this.
Here's a closer shot of the mat. The mat is "wet erase" which means I can draw on it with "Vis a Vis" markers - you can see those at the edge of the shot:
So what does this ultimately yield? Well I have an Automator action that tells the camera software to take a picture. Then it asks me to find the picture on the hard drive, passes it off to Pixelmator which does an "Auto Enhance" which adjusts the levels. Pixelmator also resizes to a 1023 pixel wide image (not sure how I picked that size, but it's what I use). Then it uploads the file to a public folder on the net and asks me for a description of the image. Finally it sends a special URL to the Rails application causing an update with the new picture and description and javascript on all the player's browsers fetches the new data automatically.
Here's an actual example from last week's session, plucked straight from the web application:
So, like I said it works pretty well. But if anybody has any suggestions I'd love to hear them. While I think having photographic lighting would be a big win so far I've been hard pressed to say what else I'd use it for. I don't do posed portraits so I'd be buying lighting equipment just for D&D, which seems ridiculous.
First off, what the what? There's a long story behind this but the key bit is that I'm running a Dungeons & Dragons campaign online. We use Skype for voice chat, and I have this moderately janky Ruby on Rails application I threw together to display pictures to the players. I pop my camera up on a tripod and point it at miniatures and upload the pictures, thus giving us an online approximation of gathering around the table and playing.
OK. So given that as background I was surprised at the amount of inconsistency I was getting from the pictures. On different nights the camera would focus on weird areas of the map, as I tried different camera angles I'd get different results, it's been a difficult process. I finally got a process I'm pretty happy with but I'm happy to hear suggestions for improvement.
A lot of it is pretty ghetto. You can see my cheap-ass tripod that is supposed to be for Karin to have at school but I sort of stole. (Not to say it's school property's - it's Karin's but it lives in my office most of the time now.) I don't have a separate off-camera flash, or a stand and a nice diffusion umbrella and all - I have a halogen work light with two independent bulbs. The camera is my Canon Rebel XTi and I use a 28mm prime lens (which given the Canon crop factor works out to the effective crop of a 45mm lens). I've screwed with the lighting a lot and the thing that seems to work best is to point both halogen lights straight up and bounce them off the ceiling. I had been pointing one sideways as a fill light but that makes some really odd shadows on the miniatures. I let the camera use its flash for some fill.
Normally I shoot in RAW mode, but for these shots I need a JPG and processing time is a concern so I just shoot JPG (the large and "unsmoothed" images since I can process them later and use better sharpening filters and the like). I usually put the camera in the A-DEP mode which tells the camera to maximize depth of field. I've left everything else on the "do what you think is best" sort of switches - so auto white balance and the like. ISO is set at 800.
OK, enough babble. Here's the basic setup:
In this shot the only lighting is the halogens you see and the flash of the camera itself. Oh, and there's a polarizing filter on the lens. Of course, normally the camera is on the tripod, but you get the idea. This was the real actual geometry I used in the last session, I just popped the camera off the tripod to shoot this.
Here's a closer shot of the mat. The mat is "wet erase" which means I can draw on it with "Vis a Vis" markers - you can see those at the edge of the shot:
So what does this ultimately yield? Well I have an Automator action that tells the camera software to take a picture. Then it asks me to find the picture on the hard drive, passes it off to Pixelmator which does an "Auto Enhance" which adjusts the levels. Pixelmator also resizes to a 1023 pixel wide image (not sure how I picked that size, but it's what I use). Then it uploads the file to a public folder on the net and asks me for a description of the image. Finally it sends a special URL to the Rails application causing an update with the new picture and description and javascript on all the player's browsers fetches the new data automatically.
Here's an actual example from last week's session, plucked straight from the web application:
So, like I said it works pretty well. But if anybody has any suggestions I'd love to hear them. While I think having photographic lighting would be a big win so far I've been hard pressed to say what else I'd use it for. I don't do posed portraits so I'd be buying lighting equipment just for D&D, which seems ridiculous.
2008 A Plumbing Odyssey
Some of you may be aware that the bathtub in our guest bathroom has had a dripping faucet and it has since we moved in back in 2004. Well, it's been getting worse over the years and basically was mostly a matter of me just grimly ignoring it. Since Karin and I don't use that shower (we have one in the master bathroom) it only comes up when we have guests or when the cleaning service turns it on to clean. But last year Karin's dad told me that fixing the leak was probably pretty easy (I had a rap about how I didn't know what I was doing and all of the pipes were old and probably on the edge of breaking, blah, blah.) so I had recently decided that I'd take a peek before her folks visit this year for the holidays.
Turns out that replacing a faucet valve isn't all that bad, although I'll contend it's a little more difficult than I was lead to believe and needs some special tools. But then I got all aggressive and pumped up on my badass home-repair self. Short form is that I ended up replacing all of the fixtures in the bathtub: the handles, the valves themselves, the shower head, the tub faucet itself, and even the little plate that covered the emergency drain. It turns out the valve that needed the washer "replaced"? It had no washer whatsoever. WTF?
Then, completely out of my brain with home-fixit powers I attempted to remove the "unremovable" shower head on our shower. This was less successful and I ended up breaking off the pipe inside the next joint back. (Now that I've been able to look at things clearer I believe the ball joint on the neck pipe is threaded on the pipe. I was trying to remove that ball when I broke the neck pipe.)
After some careful consideration I decided to try to very carefully remove the tile had the hole for the shower neck pipe exited. This was a mistake really. Karin had made great strides at removing the grout around the tile, but she realized that at the end of it all it's still mortared to a backboard. D'oh! This left me stymied for a while and it was much later when Karin and I realized that wait a minute - that shower pipe is inside a wall. The other side of that wall is in our bedroom and that's just drywall. Well, I know how to make a big hole in drywall. I even know how to patch said hole(s) afterward (which is probably the more important bit.) Sure enough I was able to go into the other side of the wall, find the elbow bend with the bit of pipe inside, and try to remove it. It was well and truly stuck and what I actually managed to do was unscrew the pipe connecting the elbow to the T-joint where the hot and cold water feed into a single pipe. Ah well, I can make a hole down there too. Three smallish holes later I had found both ends of this pipe and had a nice clean threaded pipe end I could use to run new pipe forward.
So as of this writing both showers have completely finished plumbing again. In our shower we only replaced some pipe and the shower head since the valves and handles are fine. Karin and I have been using the guest shower while we repair the grout in our shower (it takes three days to cure the grout), and then we need to caulk around the new neck pipe. Once that shower is back in operation then I can caulk the new fixtures in the guest room. And I still need to patch the drywall, I'm going to put up the first coat of putty this afternoon. But both showers are working much better than they ever have before. I am a plumbing wizard! Fear me. And when Karin's parents visit this year I don't have to be ashamed of the bathroom we provide. (The drain is still a bit sluggish but I gotta save something for 2009. Plus drains mean getting into the crawlspace — that's a whole 'nother thing.)
Some of you may be aware that the bathtub in our guest bathroom has had a dripping faucet and it has since we moved in back in 2004. Well, it's been getting worse over the years and basically was mostly a matter of me just grimly ignoring it. Since Karin and I don't use that shower (we have one in the master bathroom) it only comes up when we have guests or when the cleaning service turns it on to clean. But last year Karin's dad told me that fixing the leak was probably pretty easy (I had a rap about how I didn't know what I was doing and all of the pipes were old and probably on the edge of breaking, blah, blah.) so I had recently decided that I'd take a peek before her folks visit this year for the holidays.
Turns out that replacing a faucet valve isn't all that bad, although I'll contend it's a little more difficult than I was lead to believe and needs some special tools. But then I got all aggressive and pumped up on my badass home-repair self. Short form is that I ended up replacing all of the fixtures in the bathtub: the handles, the valves themselves, the shower head, the tub faucet itself, and even the little plate that covered the emergency drain. It turns out the valve that needed the washer "replaced"? It had no washer whatsoever. WTF?
Then, completely out of my brain with home-fixit powers I attempted to remove the "unremovable" shower head on our shower. This was less successful and I ended up breaking off the pipe inside the next joint back. (Now that I've been able to look at things clearer I believe the ball joint on the neck pipe is threaded on the pipe. I was trying to remove that ball when I broke the neck pipe.)
After some careful consideration I decided to try to very carefully remove the tile had the hole for the shower neck pipe exited. This was a mistake really. Karin had made great strides at removing the grout around the tile, but she realized that at the end of it all it's still mortared to a backboard. D'oh! This left me stymied for a while and it was much later when Karin and I realized that wait a minute - that shower pipe is inside a wall. The other side of that wall is in our bedroom and that's just drywall. Well, I know how to make a big hole in drywall. I even know how to patch said hole(s) afterward (which is probably the more important bit.) Sure enough I was able to go into the other side of the wall, find the elbow bend with the bit of pipe inside, and try to remove it. It was well and truly stuck and what I actually managed to do was unscrew the pipe connecting the elbow to the T-joint where the hot and cold water feed into a single pipe. Ah well, I can make a hole down there too. Three smallish holes later I had found both ends of this pipe and had a nice clean threaded pipe end I could use to run new pipe forward.
So as of this writing both showers have completely finished plumbing again. In our shower we only replaced some pipe and the shower head since the valves and handles are fine. Karin and I have been using the guest shower while we repair the grout in our shower (it takes three days to cure the grout), and then we need to caulk around the new neck pipe. Once that shower is back in operation then I can caulk the new fixtures in the guest room. And I still need to patch the drywall, I'm going to put up the first coat of putty this afternoon. But both showers are working much better than they ever have before. I am a plumbing wizard! Fear me. And when Karin's parents visit this year I don't have to be ashamed of the bathroom we provide. (The drain is still a bit sluggish but I gotta save something for 2009. Plus drains mean getting into the crawlspace — that's a whole 'nother thing.)
Turns out that replacing a faucet valve isn't all that bad, although I'll contend it's a little more difficult than I was lead to believe and needs some special tools. But then I got all aggressive and pumped up on my badass home-repair self. Short form is that I ended up replacing all of the fixtures in the bathtub: the handles, the valves themselves, the shower head, the tub faucet itself, and even the little plate that covered the emergency drain. It turns out the valve that needed the washer "replaced"? It had no washer whatsoever. WTF?
Then, completely out of my brain with home-fixit powers I attempted to remove the "unremovable" shower head on our shower. This was less successful and I ended up breaking off the pipe inside the next joint back. (Now that I've been able to look at things clearer I believe the ball joint on the neck pipe is threaded on the pipe. I was trying to remove that ball when I broke the neck pipe.)
After some careful consideration I decided to try to very carefully remove the tile had the hole for the shower neck pipe exited. This was a mistake really. Karin had made great strides at removing the grout around the tile, but she realized that at the end of it all it's still mortared to a backboard. D'oh! This left me stymied for a while and it was much later when Karin and I realized that wait a minute - that shower pipe is inside a wall. The other side of that wall is in our bedroom and that's just drywall. Well, I know how to make a big hole in drywall. I even know how to patch said hole(s) afterward (which is probably the more important bit.) Sure enough I was able to go into the other side of the wall, find the elbow bend with the bit of pipe inside, and try to remove it. It was well and truly stuck and what I actually managed to do was unscrew the pipe connecting the elbow to the T-joint where the hot and cold water feed into a single pipe. Ah well, I can make a hole down there too. Three smallish holes later I had found both ends of this pipe and had a nice clean threaded pipe end I could use to run new pipe forward.
So as of this writing both showers have completely finished plumbing again. In our shower we only replaced some pipe and the shower head since the valves and handles are fine. Karin and I have been using the guest shower while we repair the grout in our shower (it takes three days to cure the grout), and then we need to caulk around the new neck pipe. Once that shower is back in operation then I can caulk the new fixtures in the guest room. And I still need to patch the drywall, I'm going to put up the first coat of putty this afternoon. But both showers are working much better than they ever have before. I am a plumbing wizard! Fear me. And when Karin's parents visit this year I don't have to be ashamed of the bathroom we provide. (The drain is still a bit sluggish but I gotta save something for 2009. Plus drains mean getting into the crawlspace — that's a whole 'nother thing.)